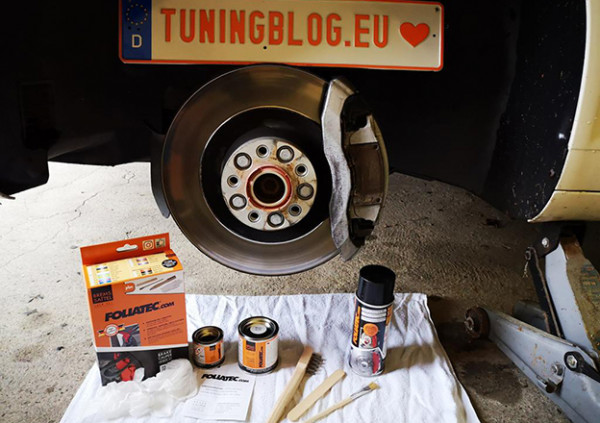
Almost 440 enquiries last month on the subject of "painting brake callipers" prompted tuningblog.eu to make a small tutorial on the subject. The test object was a VW Phaeton, whose brake callipers have become extremely unsightly over the last eight years. tuningblog.eu decided to use the 29.95 € brake caliper paint set from FOLIATEC, which is available in almost every colour. Certainly, red is one of the most popular colours here. tuningblog.eu, considering the vehicle class, has decided on a glossy white in the style of the campanella white paintwork of the Phaeton. The colour red stands for sportiness; the Phaeton is pretty much the exact opposite - it doesn't even have a sports brake system.
Let's get started:
Step 1: rough clean

First step: clean with a high-pressure cleaner, rinse with water and let dry.
Step 2: Remove dirt, rust, etc.

Remove the wheel and clean the brake calliper with the wire brush supplied.

Note: The wire brush supplied by FOLIATEC is robust and well-intentioned, but in our opinion it is no substitute for a drill with a brush attachment. We cleaned our brake system with the drill to create the optimal basis.
Wire brush is included in the FOLIATEC scope of delivery.
Step 3: Clean with brake cleaner

Apply brake cleaner according to the instructions (enclosed) and allow to flash off for approx. 5 minutes.
Step 4: Mask off the brake
You should mask off the brake extensively. Do not get any paint on the rails of the guide bolts, the bleed screw or the support of the brake pads. The holes for the spring clips must also be kept free of paint, and a little tape is also useful for the brake disc.
Info: Our car got new discs and pads all around, so we didn't tape them! Vent screw and the like remained without paint!
Step 5: Apply the first coat
Info: If possible, prepare all four brake calipers for painting in advance. The paint can only be applied without problems for about 2 hours - after that it starts to harden. If all four brake systems have already been prepared, it is possible to work quickly without any problems and there is no risk of the paint hardening before completion.
Mix the paint according to the instructions. It is best to mix the lacquer and hardener completely.
Leave the varnish to rest for approx. 10 minutes and then apply a first thin coat with the brush provided.
Step 6: Apply a second coat

Don't worry - although the total amount of varnish seems anything but rich, it is more than sufficient. White is certainly one of the less suitable colours, as the covering power is lower than with other colours. That's why we painted each brake caliper a third time and still had plenty of paint left at the end of the Phaeton's complete brake system. We would like to mention that especially the front brake system of the Phaeton has a really big brake caliper and still the amount of paint is more than enough.
Paint at least 2 times.
The result is impressive
In our opinion, the job was well worth it. The result is really something to be proud of. For a little self-promotion we ordered heat-resistant tuningblog.eu logos for the front axle, which we will present in a little photo story in the next few days.


Rear brake before - rear brake after.

Front axle before - front axle after .
The characteristics of the brake caliper paint set from FOLIATEC:
Available: Brake caliper paint set in many colours as well as the NEON variant.
◦ Lacquer seals and preserves the surface of the caliper permanently
◦ Resistant to chemicals, corrosion and oil and heat-resistant
◦ Easy to clean
◦ 7-piece set (for NEON colours - 10 pieces)
◦ no removal of parts necessary
◦ enough paint for 4 brake callipers
◦ Contents: Brake special cleaner, 2-component paint system (125 ml paint + 50 ml hardener), 1 wire brush, 1 brush, 1 spatula, disposable protective gloves

See the article on tuningblog.eu here!


